New post
Avatar
0

Hello all. I'm running a GPO 5 on Finale v. 25 in Windows 7. I'm experiencing two separate issues, which I'm hoping someone can assist me with.

1) Bass Vocal patch: apparently, the range of the bass patch does not extend above A3 (A below middle C), which is absurd; any good section of bass singers within a professional SATB ensemble should be able to sing higher that A3. Is there a way I can extend the range of this patch? 


2) In an attempt to work around this limitation, I tried applying the “Full Choir” patch to the bass part in the score, but that particular patch starts to clip after cut out after a half-second or so, and seems to "infect" the other vocal patches with the issue once loaded. 


Any help you could provide would be tremendously appreciated! Thanks so much.

22 comments

Date Votes
Avatar
0

Hi everyone,

so, just to piggyback on my initial post; it now appears that a majority of my instrument patches are "clipping", meaning that, after sustaining for around a half a second, the loud "clip" sound is heard and the sound immediately cuts off. I can't imagine this is occurring to due to a hard drive limitation (I have a fairly powerful laptop with a solid-state drive). 


Please help!

-Frank

Comment actions Permalink
Avatar
0

Here's a thread that might be helpful on extending the Basses:

https://makemusic.zendesk.com/hc/en-us/community/posts/115006814707-Poor-Bass-Voice-Upper-Range-in-Garritan-Personal-Orchestra 


On clipping samples, there are a number of things it might be.  I once had an issue with a specific PNY branded solid state drive in a particular AMD Phenom II based system that went away after moving the sample library to some other brand/type drive (Not just with Garritan, but with other D2D sample based plugins too...even with much older/slower drives, the glitches went away once I moved the libraries).  Something about the drivers with that particular SSD device just don't get along with real time streaming short samples on my particular system.  Despite the SSD passing a number of 'latency check' tests, and demonstrating better than average transfer rates, it still gave me fits with plugins in Finale, Sibelius, CuBase, and more.  In this case, the drivers were constantly issuing a type of system interrupt that caused glitches in all of my DAWs.


Having said that, it does NOT mean the disk driver is your problem.


You might first try the following:


1.  Go to the info tab of Aria Player and make sure the player and ARIA engine are both updated to the most current version.


2.  If your audio device driver has adjustable buffer sizes, try increasing their size.


3.  Set the max number of polyphony/voices to something fairly high, say 400.  Larger scores need more of course.


4.  If you still get clipping after raising the overall polyphony, check the same for individual instrument slots.


5.  Check memory settings in the Info tab.


6.  Is it only one or two instruments that suffer glitches, or is it rampant across the entire library?  Some instruments in Garritan libraries could use better loop points for some notes (and we can change this as users in an instrument's sfz file, but that's a more involved discussion for a new thread).


7.  Is ARIA the only plugin you have/use that suffers this issue?  If other plugins do it too, check that your DAW is set up to use the best audio drivers on your system.  I.E.  In a Windows system with Finale one can often choose from a number of different driver interfaces to any given audio device (ASIO, WDM, etc.). 

Some DAWs on Windows will only work with an ASIO driver (or some sort of ASIO bridge to a non ASIO driver), and if your audio device does not have ASIO drivers then some sort of WDM>ASIO pipeline has to be set up.  For some users with a non ASIO card, ASIO4ALL sometimes works better than whatever bridge came with the DAW, so that might be worth a try.


8.  If you have a spare hard drive of some type you can plug in, install the library to the new location and see if that helps.


If none of that works, go ahead and file a ticket with customer support.  They may ask you to run some diagnostics and return the report to them for analysis (they can differ between Macs and different variants of Windows, so I'll not try to guess on which ones you'll need in this post).

Comment actions Permalink
Avatar
0

Hi Brian.

Thank you so much for your time and thoughtful suggestions - I really appreciate it. I'll use your tips and report back on progress, and will also read the link regarding extending the basses. 

Comment actions Permalink
Avatar
0

Happy to report that your advice on editing .sfz patches to extend the bass range worked like a charm! Again, thank you so much for your guidance. My SATB choir sounds so much more balanced now that each staff is assigned its natural voice (I had been using the "full choir" patch in the basses to compensate for the range limitation). 

Comment actions Permalink
Avatar
0

Hello Brian,

Another question for you, if you don't mind; is there I can "build" a patch that can be loaded into a single instrument slot in the Aria player? For example: I'm using Garritan as the sound source for Finale v..25, via the Aria player. As it stands, each instrumental staff in the orchestral score I'm currently working on is assigned an individual channel in an Aria player bank. My score calls for four horns, in the standard 2-stave format (Hns I&II on staff 1, Hns III and IV on staff 2). For both staves, I've loaded the same patch - the SAM French Horn Section KS. While this is a GREAT sounding patch, it *is* rather overwhelming from a balance perspective, especially when all four horns are playing. What I'd love to do is load 2 individual "plr" patches into each staff/channel. so that the resulting output is truly that of 4 horn individual players, and *not* two whole horn sections. Is it possible to load two patches into the same channel, to be played by a single staff in Finale? 

Thanks again for your help. 


-Frank

Comment actions Permalink
Avatar
0

Using Multiple Layers


You can run multiple layers/voices on a stave.  You could also opt to working with separate staves and hiding or superimposing things, etc.


Here is one example method using stave layers.


1.  Set up your Horn staves as you normally would.


2.  Open the ScoreManager.


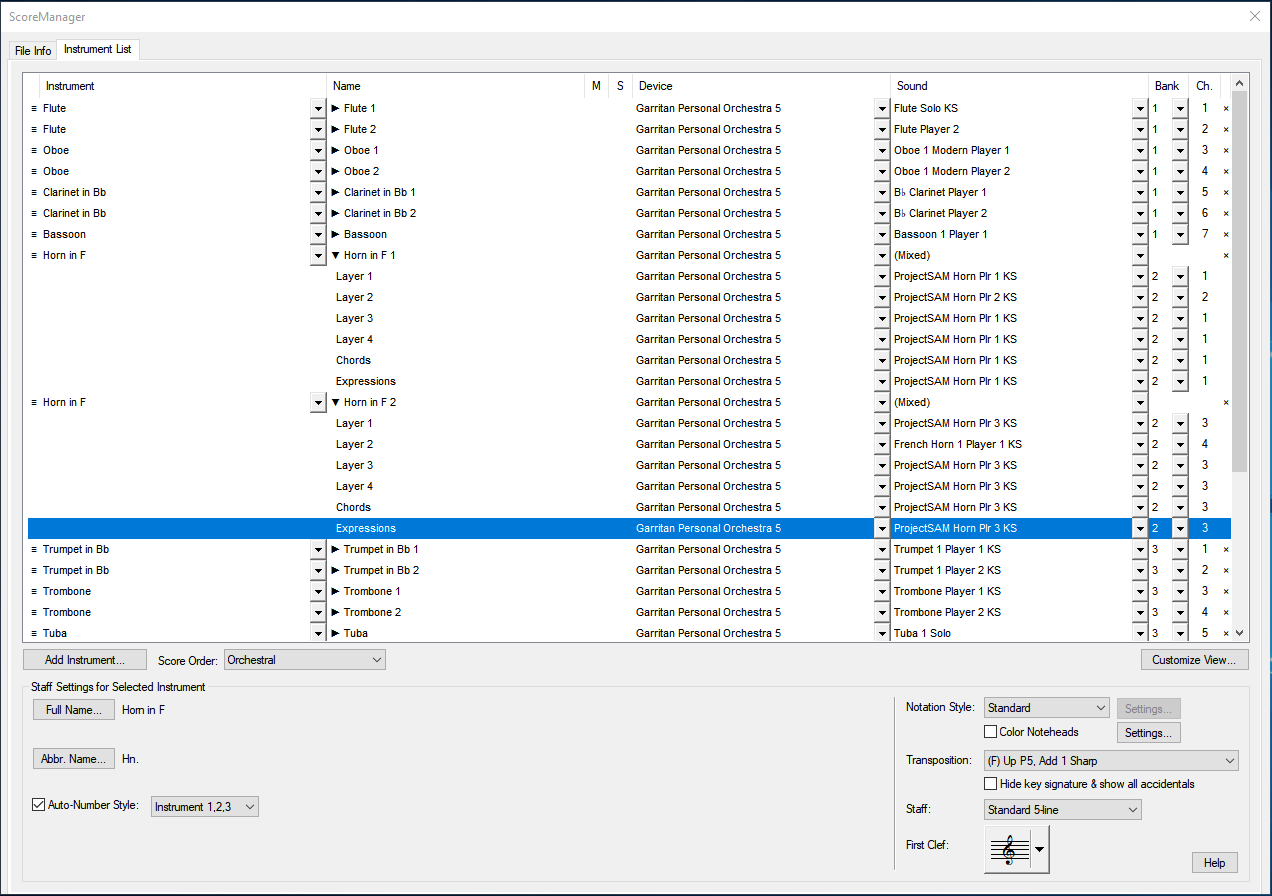
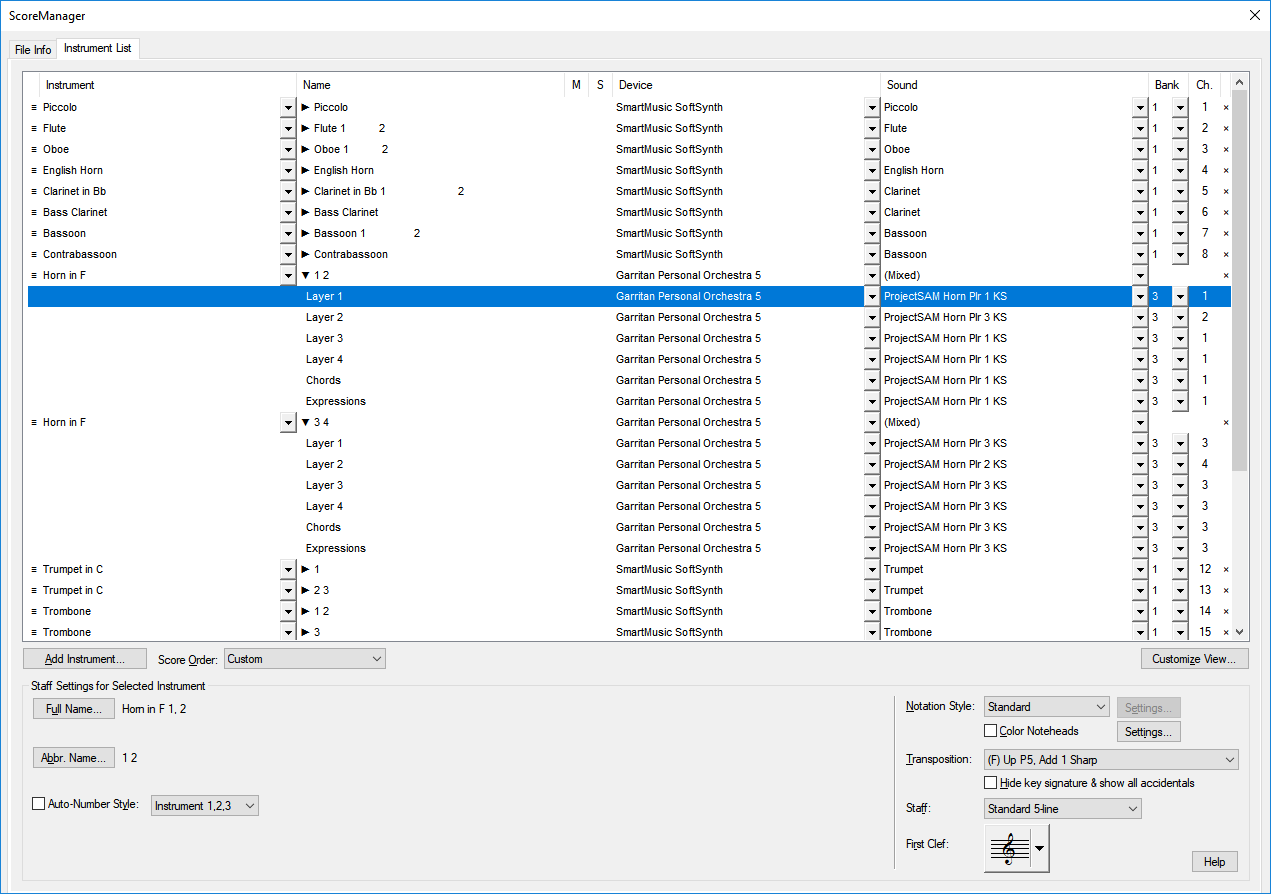
3.  Click the little arrow beside the Instrument Name for your Horn staves so they unfold, then assign the individual horn parts you want for each layer.


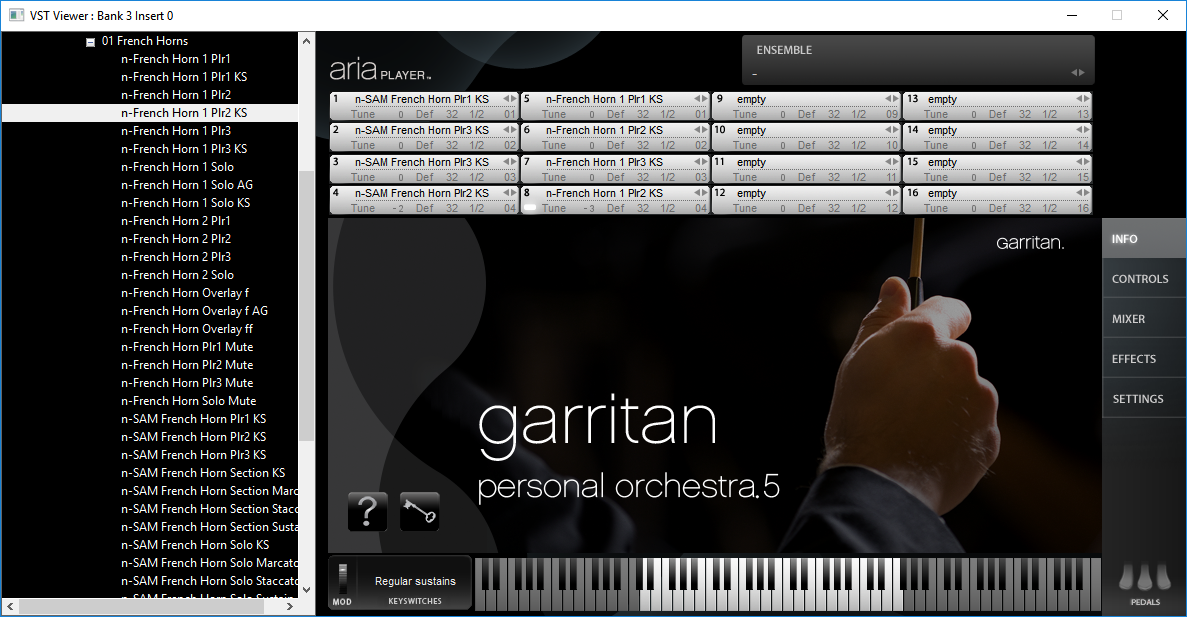
 Note:  In the example above I've chosen to load several ARIA instances from the VST Banks & Effects dialogue and allocate various groups and sections of instruments to a specific ARIA instance.  This is done through the 'bank' column of ScoreManager.   I typically do this because it gives me more head-room for layering up my own custom instrument sections.  It also makes it possible to disperse the different sections through unique reverb settings per instance.


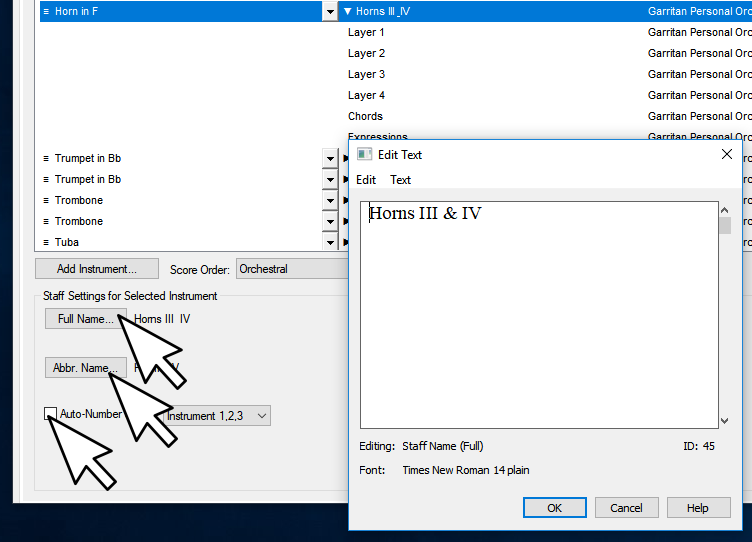
3.  Disable the Auto-Number style and configure the stave names as you like for each horn stave.


 4.  At this point you should enter each part on the stave as a unique layer.  Using this layering method you can have up to 4 parts per stave, and they can be contrapunal in nature.  There are some tools throughout Finale that can help move selected notes to different layers if you need to go back and move some things around in a score you've already begun.


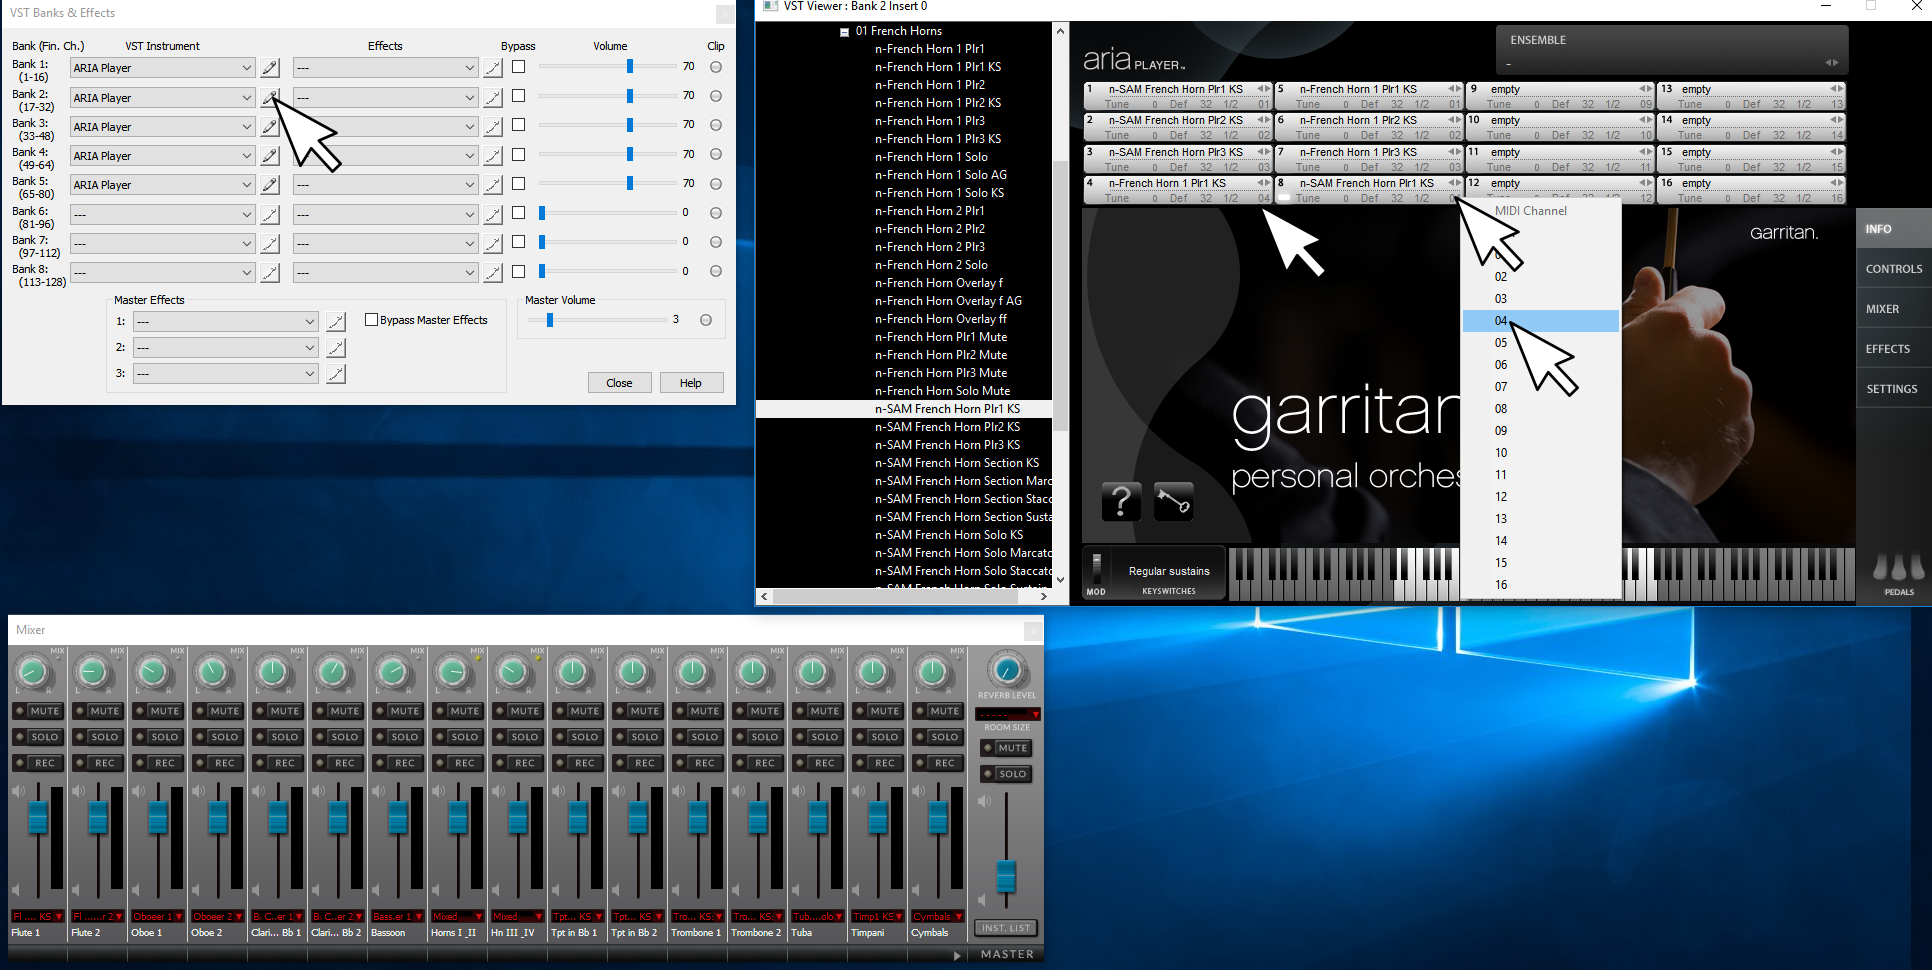
If the above configuration is a little thin, and you want to simulate 2 or more  horns on 'each part', then use an empty instrument slot in ARIA to load up more horn players, then set the ones you want layered up on the same part to the same MIDI channel in the ARIA instrument panel. 


If you end up duplicating players in a layer, a little detuning on some of the instrument slots might help.  Also, the brass 'overlay' instruments provided in GPO can really come in handy if you layer that in at the right time and volume (personally I like to control overlays from an independent stave, that'll ultimately be 'hidden' from viewing/printing).


Using fully independent Staves


Giving each sounding horn player his own stave is the simplest way to do it (in my opinion).  Then each horn player could have a unique instrument assigned in ARIA.  For printing purposes you could either experiment with superimposing staves on top of one another; or just make a divisi or condensed style stave for printing purposes, but point it to play back from an 'empty' instrument slot in ARIA (a dummy, so the stave doesn't actually make any sound on playback).  Hide your 'playback staves' from printing.  If it helps your workflow, you can always work in reverse, and just do things like you always have during composition stages, and when you get ready to craft a more polished sounding mix, copy, paste, and extract all the parts to their own individual 'playback staves' (so each virtual player gets his own unique stave).  Again, you'd eventually hide the stuff you don't want printed, and point the condensed staves to null instruments that make no sound on playback.


Use Lots of ARIA Instances


Another tip that helps a good deal with brass...........give brass a unique ARIA instance.  This way you can use a bit more, and a different variety of reverb than you would for the rest of the band/orchestra.  I find it helps to meld the overtones so the brass doesn't come across as being so strident and 'dry'.  In fact, if you have plugin slots to spare,  spread each section out to his own ARIA instance.  Getting in that habit will ultimately give you more head-room for 'building your own custom sections' and working out a more realistic, better balanced overall mix.  Being able to have different reverbs set up for strings, woodwinds, brass, percussion, various soloists, etc. can make a big difference in the quality of the mix you can ultimately achieve with a bit of practice and experimentation.


Rolling your own SFZ


As for rolling your own ARIA instruments at the SFZ level (and even making use of your GPO sample content in the process).  Yes, you can do this; however, it would not help with the matter of stacking multiple horn parts on the same stave in Finale.  Sorry, I don't know of an SFZ opcode that can sort out high and low notes (in the case of a two voice/layer stave) coming over the same channel and effectively figure out how to emulate two truly independent horn players.  Some modern sampler engines with complex scripting engines or nested booleen switches can do it (Halion, Kontakt, Mach 5, Omnisphere, etc.), and ARIA can do it with a little help from something like Bidule, but I'm not aware at this time of a native ARIA opcode that could do it.


Comment actions Permalink
Avatar
0

Bonus Tip


For folks trying to do a full mix down all in Finale, I highly recommend picking up a Multi Band Dynamic Compressor and a good EQ.


There are some nice free ones to be had.  I highly recommend grabbing the ReaPlugs package from here:  https://www.reaper.fm/reaplugs/ 


Why do you need them?

How often have you tried to get that drum kit to work in a mix, but when you mess with the volume to get the snare drum right, the rest of the kit is too much or too little?  What about those moments when you'd like to bring out just a certain range of overtones for an instrument to 'brighten' it up, or filter out some overtones that are overbearing?  A good EQ and multi band compressor can fix you up.


I.E.  One could use the multi-band compressor to hone in on the prevalent frequency range of a snare drum and keep its dynamics 'compressed' to stay fairly 'fixed' at a given db range.  The multi band compressor linked above is pretty robust, as you can carve out notches of frequencies you'd like to bring into the foreground of a mix and keep there, while leaving the rest alone.

Comment actions Permalink
Avatar
0

Hi Brian,

Such great tips and advice - thank you again! I really liked what you mentioned regarding working in reverse; compose as as I normally would, and then, when it's time to craft a polished audio output, extract the divisi staves to individual staves. That, however, poses a dilemma for me; in Fianale. how does one go about extracting a single stave with multiples levels (i.e., a single stave for Horn I & II, with divisi passages) into two individual staves? In all of my years working with Finale, I've never learned how to perform that function - is it even possible? Same question for the reverse - is it possible to "merge" two unique staves into one staff with multiple levels? 

Comment actions Permalink
Avatar
0

Bump...

After doing some research I've gone back and reworked my previous posts above to include corrections, screen shots, and hyper-links.  Come check it out.

Comment actions Permalink
Avatar
0

Another 'fun' tip for choirs if you have some time on your hands and enjoy fiddling with voice synthisis....

Grab Alter Ego.  It's free!

Yes, it does sound pretty robotic or cartoonistic in Finale (not at all like classical trained vocalists), but if you layer it up with the bog standard ohs and ahs from GPO5, punch the lyrics into Alter Ego, then lower the volume of Alter Ego and tweak it a bit, you can add 'lyrics' to your mix and get some pretty interesting results.

Comment actions Permalink
Avatar
0

Frank,

From current projects forward I highly recommend that you give each 'part' on a divisi stave a unique layer.  Just get in a habit of doing it while you compose.  That doesn't help you much with work you've already done and wish to sort out.


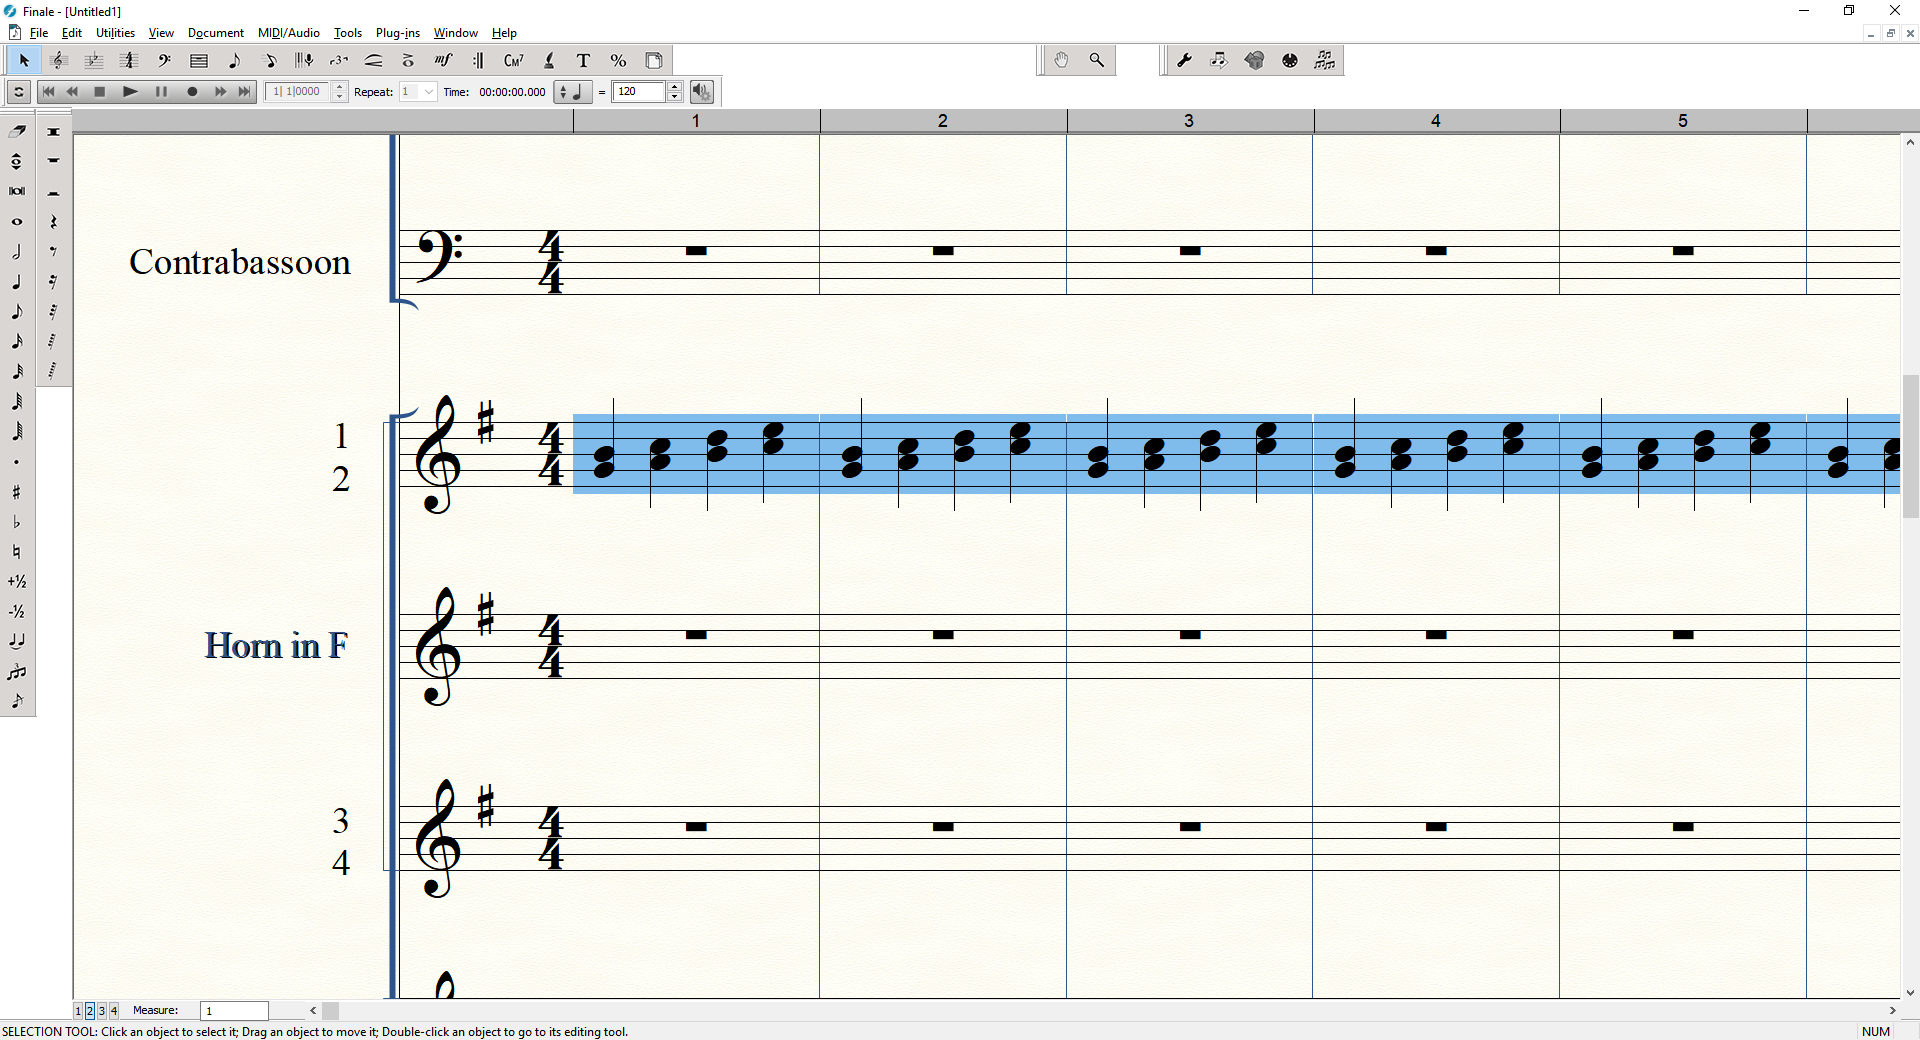
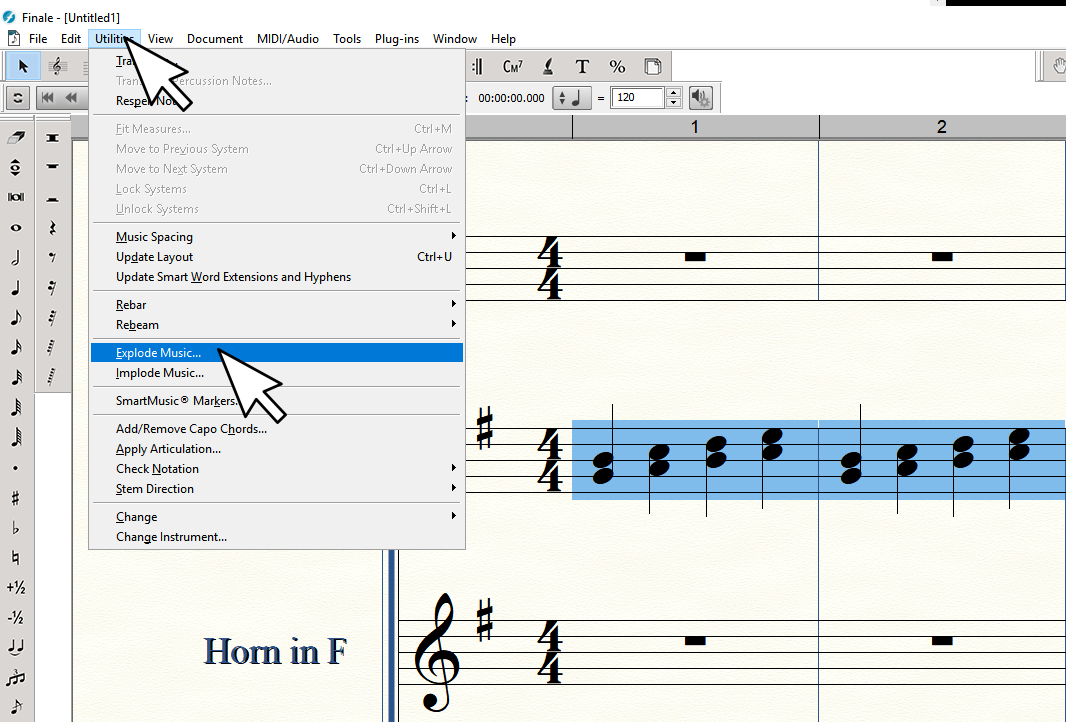
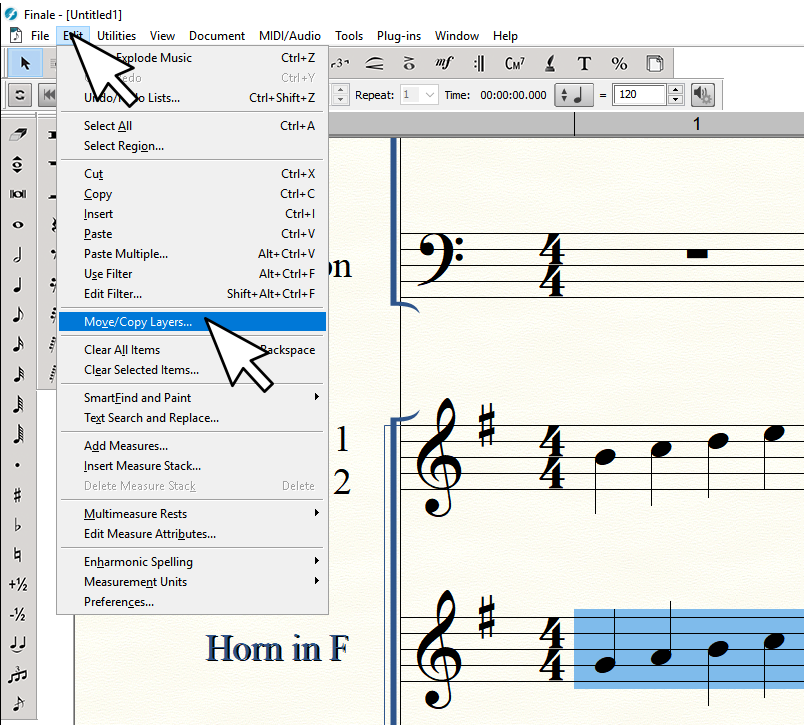
To extract a divisi stave into two independent staves select all of the music inside a stave using your favorite method and then use the "Utilities/Explode Music" option.  Experiment with this feature, as there may be situations where it is easier on work flow to create new empty staves first and then run the Explode. 


If you just go with the defaults of 'exploding/imploding to a new stave at the bottom of the score' (which I think can be changed if you like) and run explode it'll use a grand staff in concert key, and you'll have to wait for a piano sound to load (can be pretty a pretty large instrument plus a long wait if GPO5 is set to the default sound-set); then, you'd need to convert it all back to single stave/French Horns, etc.  So....make your fresh empty staves first, all set up as you like!


Here is an example workflow:


Before experimenting with a project that you've already invested a lot of time, back up your score and work from a safe copy just in case you make mistakes during the learning process.  New questions might pop up as you try things and get varied results.


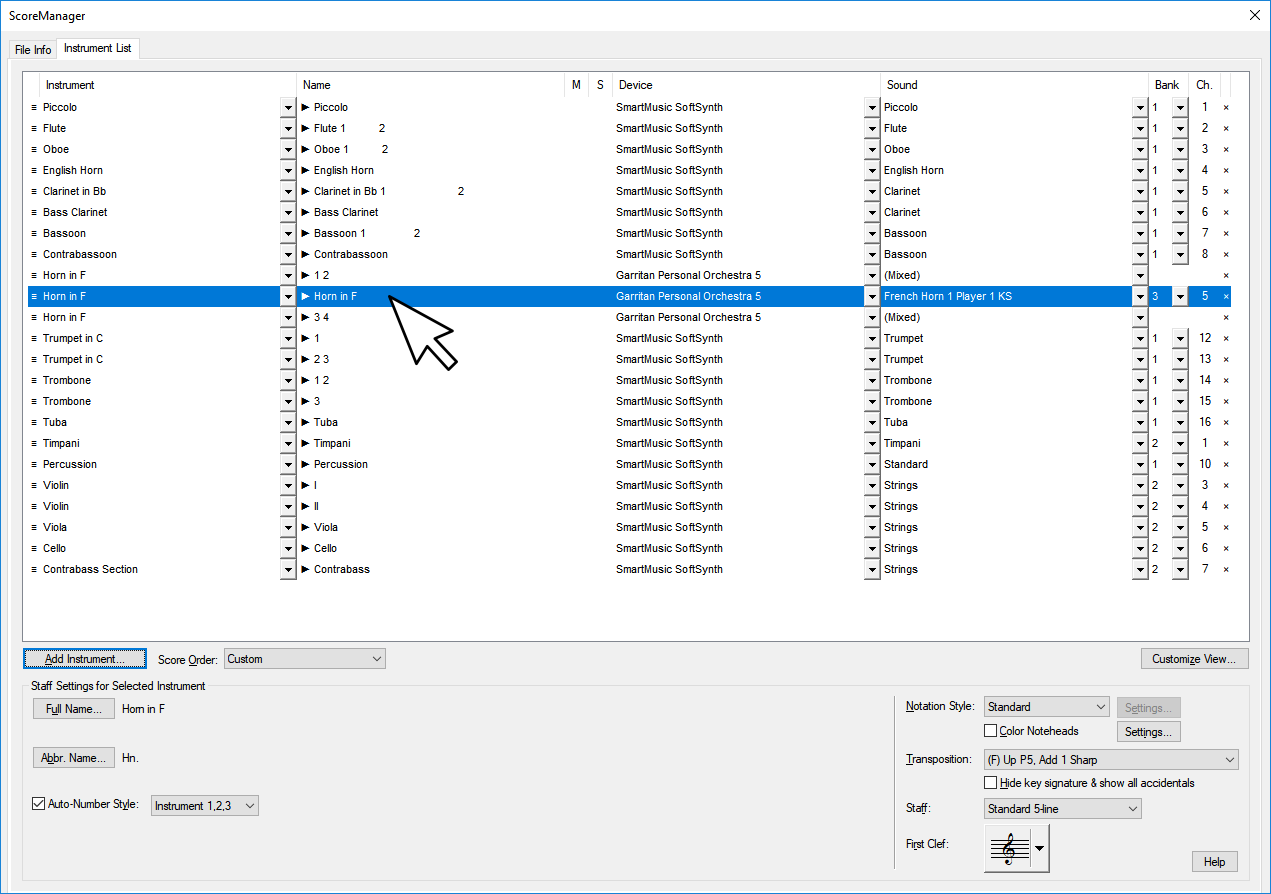
1.  Open Score manager and create a fresh empty Horn staff under your original Horns 1 and 2 stave.  Go ahead and assign the stave to what ever instrument(s) you want it to use while you're in the ScoreManager.  This will help avoid user confusion with various staff transpositions that happen when cutting and pasting things about.


2.  Back in your score view, while in select mode, select your original Horns 1 & 2 stave.  There are a number of ways to do this, but I usually just click the first measure of the piece for the stave, then hold the shift key and and press the 'end' key.


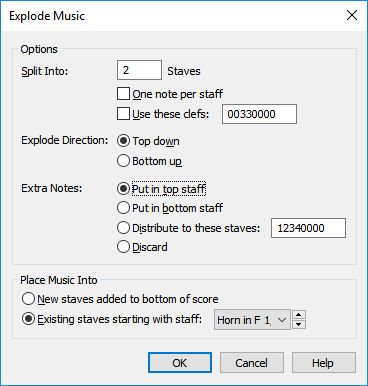
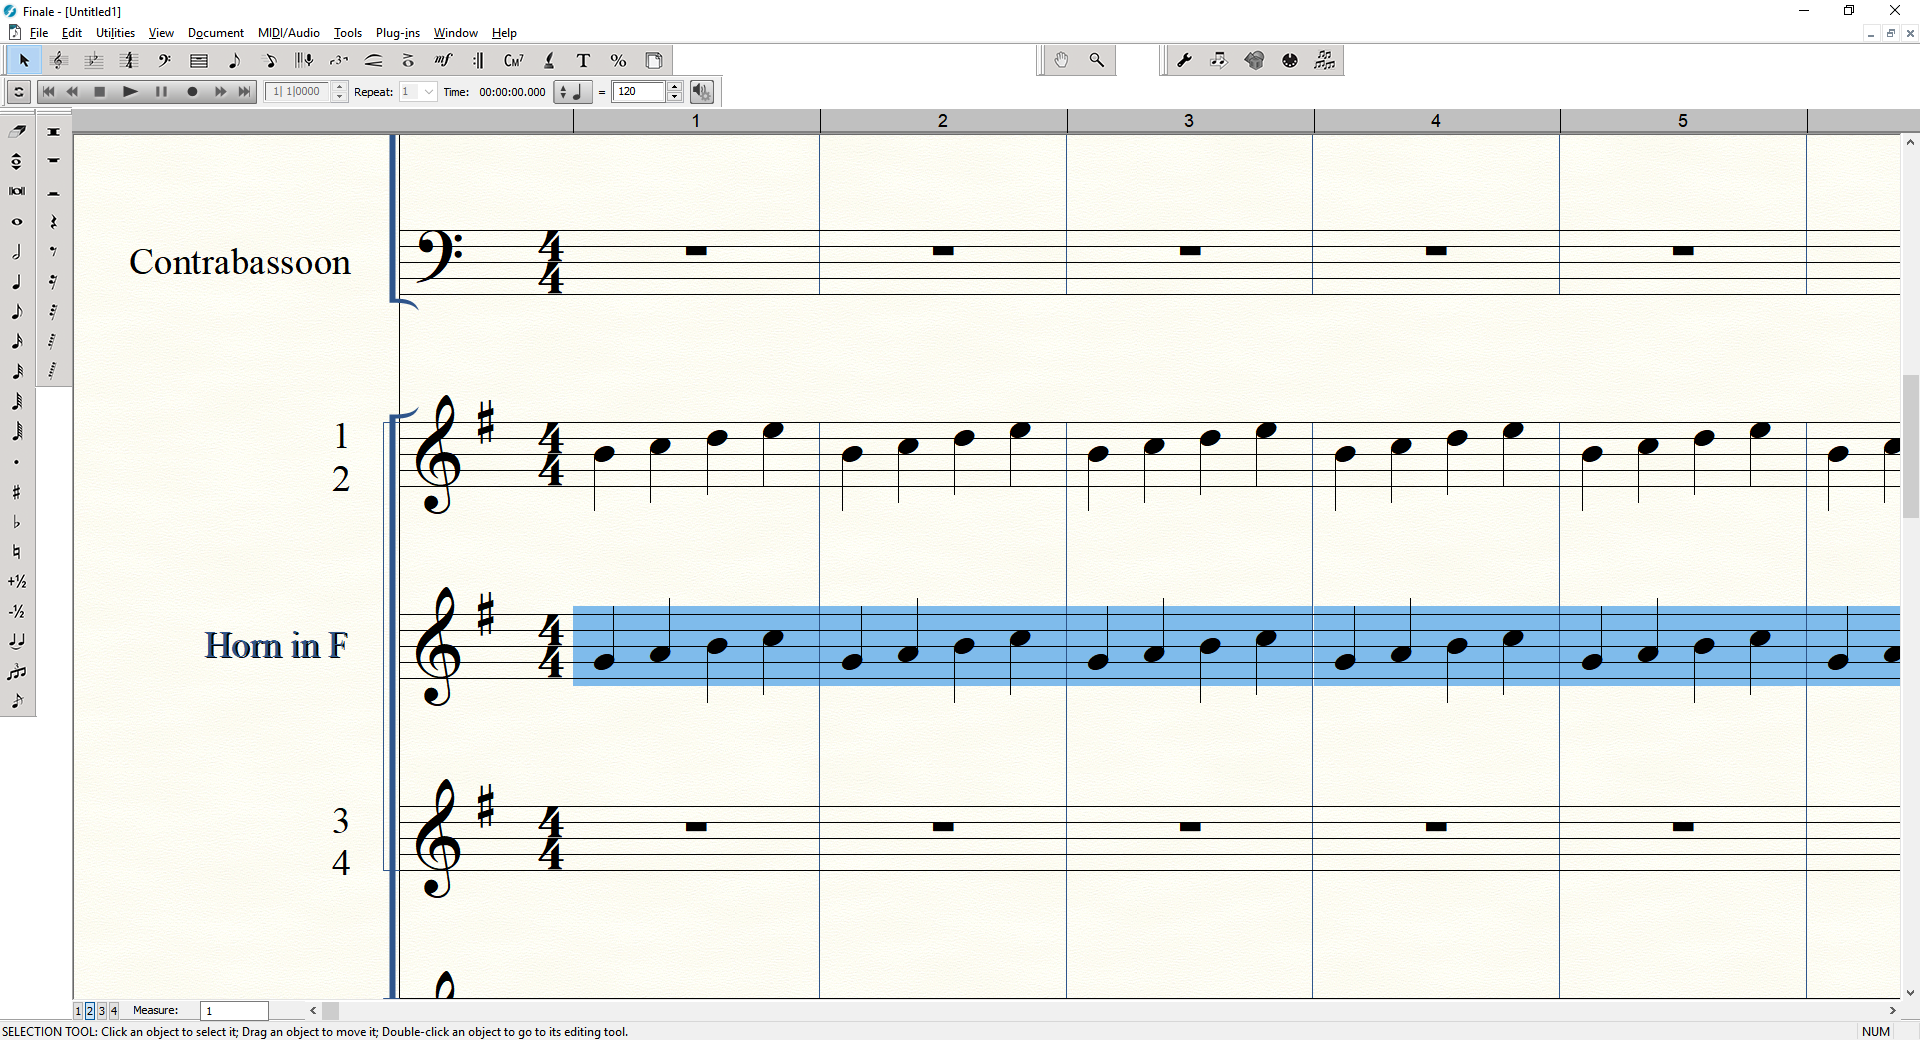
3.  Now that the full passage is selected run "Utilities/Explode Music".  Direct it to use the Original stave and your new stave for the output.  It should replace the original stave for voice 1, and fill in the new stave with voice 2.


At this point you should find that your parts were split into two staves.  Browse the score to make sure everything worked out as you hoped.  Some manual corrections might be needed in some cases.  Note, if you prefer to work non destructively from your original staves you can send the result to two fresh staves instead of 'overwriting' the original.  Try some things, experiment, practice with the explode tool.  Over time you will become aware of how things like dynamic and articulation markings attach to things, and you'll know better in terms of where to best place temporary staves in score order to get the desired results.


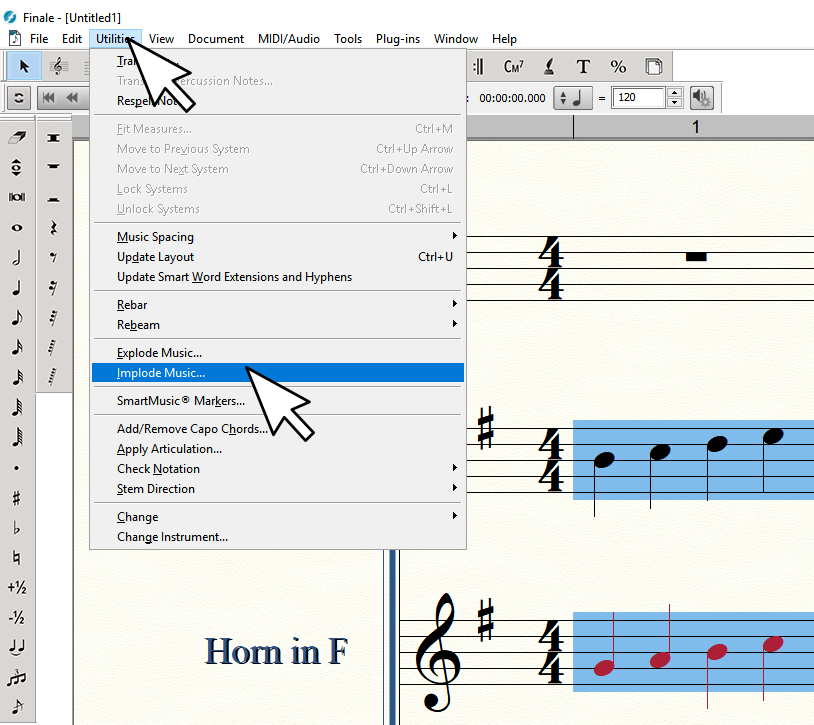
Now, if you like, you can move your second horn part to a different layer, and then use "Utilities/Implode Music" to create a merged staff.


1.  In the new stave holding your horn 2 part select all the music.  I.E.  Click the first stave, then hold shift and press the 'end' key.


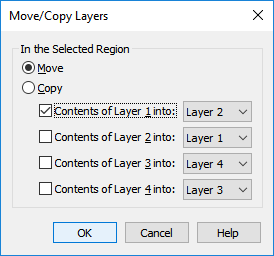
2.  Go to "Edit/Move/Copy Layers" and set up the dialogue to move layer 1 to layer 2.


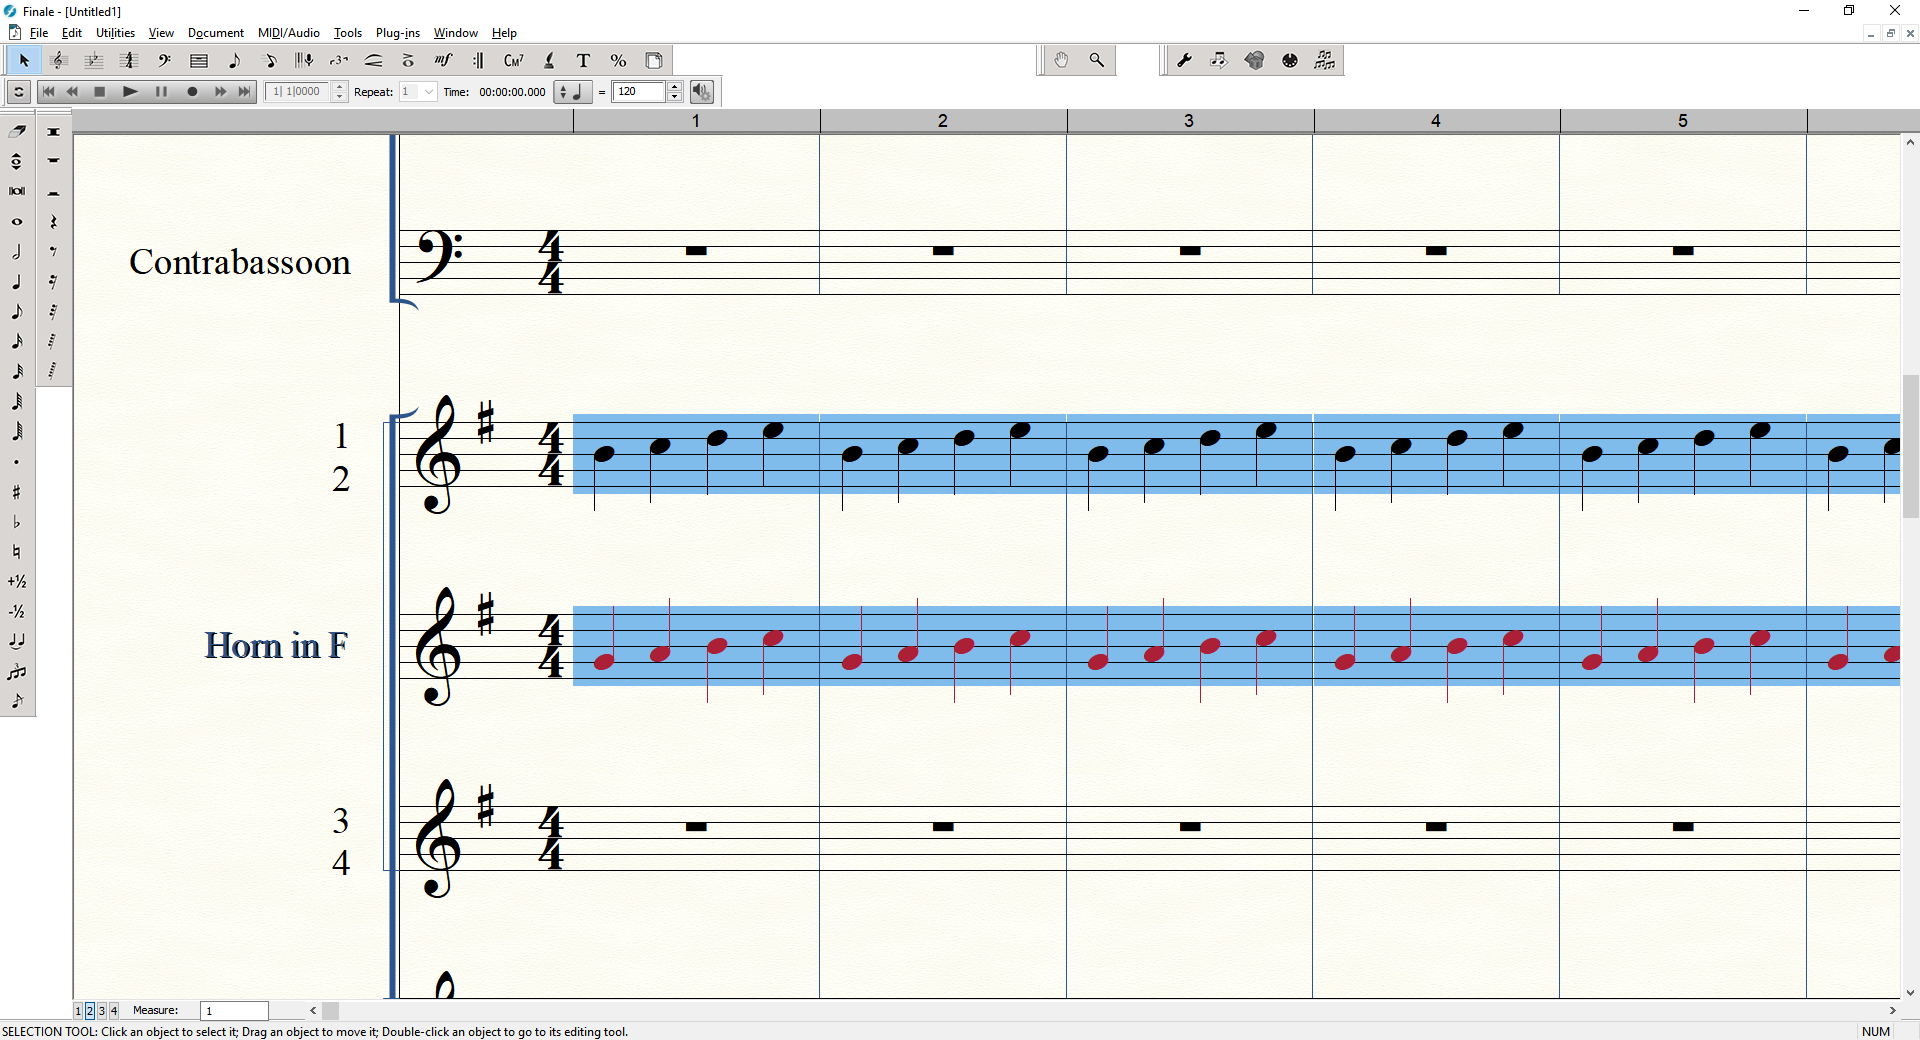
After clicking OK you should see that the selected notes have changed color to reflect that it is on a new layer.


3.  If needed, use the Score manager to set the score order so the two staves you wish to 'merge or implode' are arranged so one is directly under the other. In this example we've already taken care of this so move on.


4.  Select all of the music in both staves.  I.E.  Click the first measure of the top staff that will be imploded.  Hold shift while selecting the first measure of the second stave that you will implode.  Hold shift and tap the 'end' key.


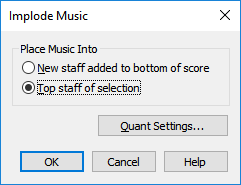
5.  Go to "Utilities/Implode Music".  Choose 'top staff of current selection' from the Implode dialogue then click OK.


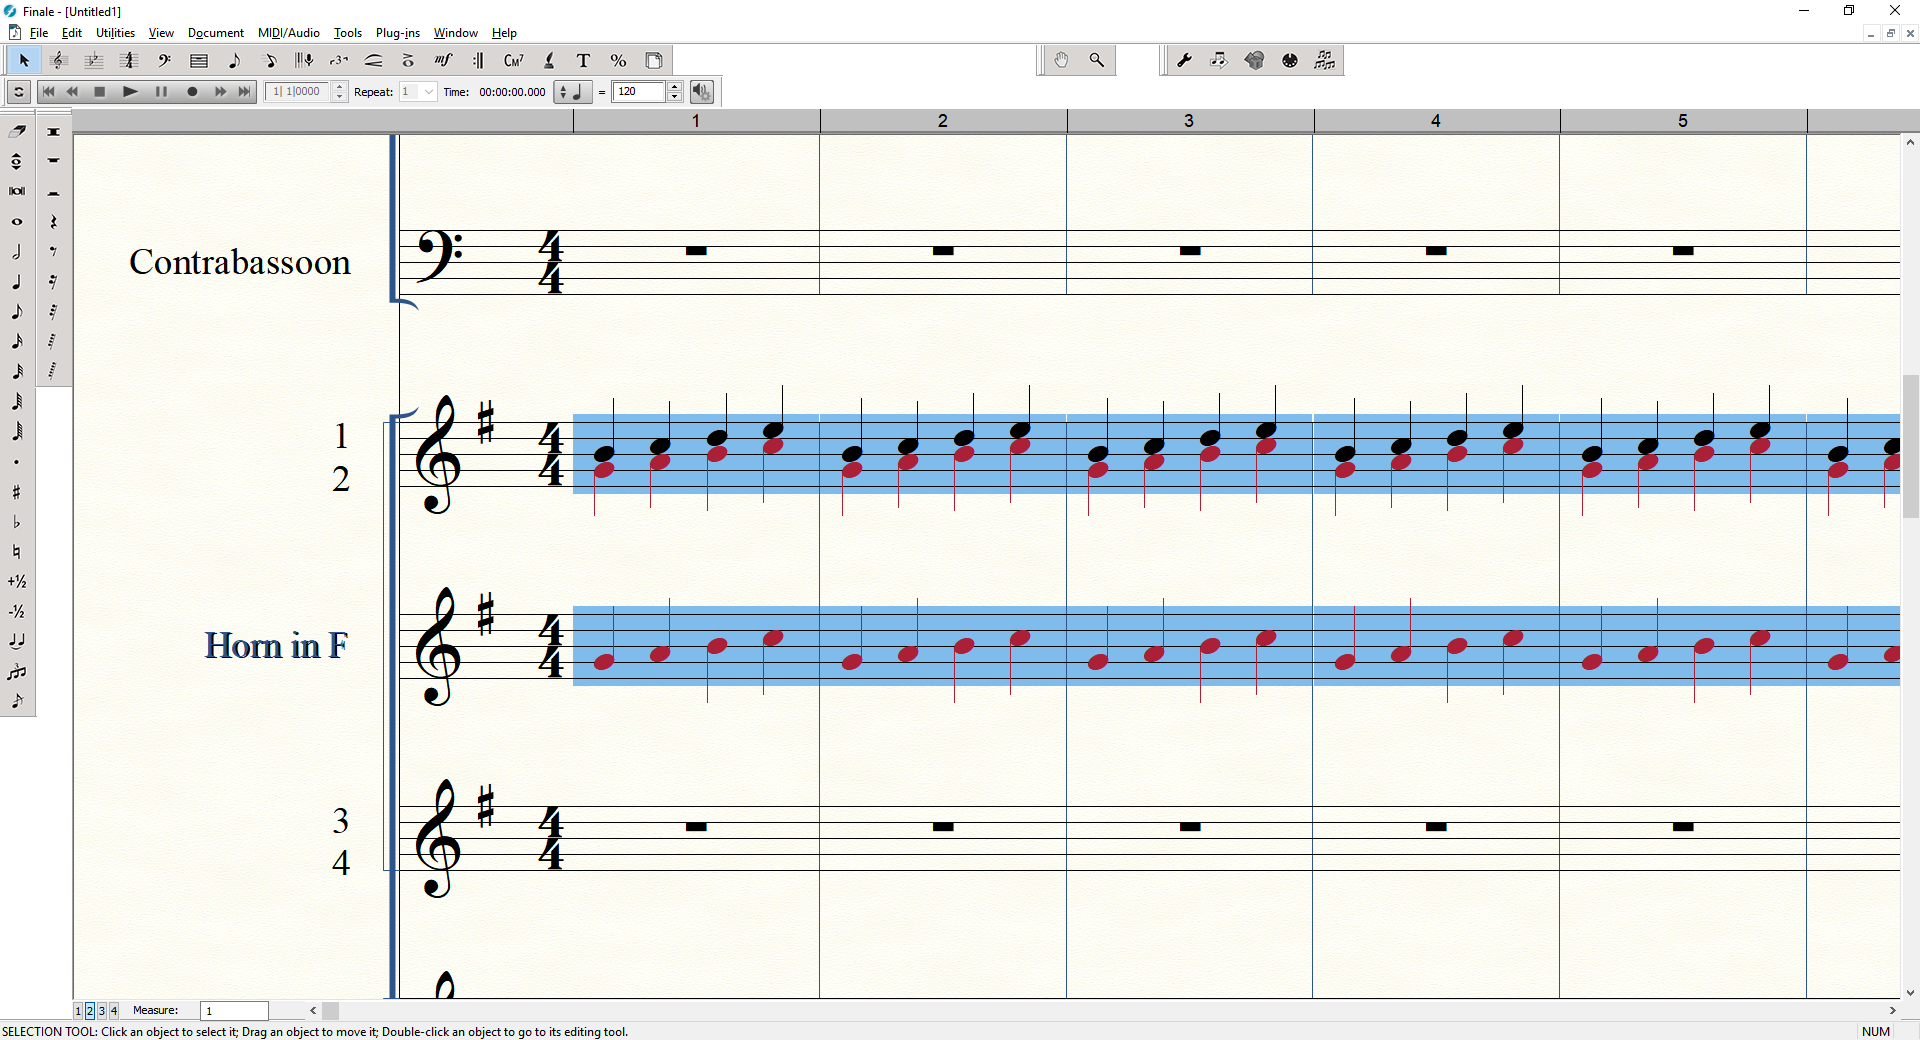
Now you should see that your original Horn 1 & 2 stave is divisi again, but now each voice is on his own layer.


From here you might not like the defaults for the way stems are drawn and such, but you can adjust those with "Utilities/Stem Direction".  There may also be options deeper in Finale to set up rules for each layer.


Having forced all the stems 'Up' I now get this as a result:


You'll also notice that you still have a stave left behind with your horn 2 part still in it.  You could clear this stave out and drop it one in score order and repeat the process for your horns 3 & 4 stave.  Once you're done with your temporary stave you can delete it from the score.


Once I've finished imploding things so each part has his own unique layer, I can go back to my ScoreManager and set up unique players in ARIA.


If I want to layer up custom sections I can do that directly in ARIA by loading new instruments and setting them to like channels.  In this example I've decided to put two virtual players on each part by manually loading some players in slots 5-8 and setting their MIDI channels to get input from channels 1-4 respectively.


Note, there is also a voice extraction plugin tool under "Plug-ins/TG Tools/Process Extracted Parts".  This can be used to strip away voices on a given stave, so it's also possible to simply copy and paste a stave then 'strip away' the voices you do not want using this plugin.


There also may be a way to create macros and scripts of your own to somewhat automate some of the steps described above.  Those possibilities are a bit much for me to try to dive into here, but for future reference it's something to consider researching on your own.  If you need power user plugins for Finale, you might also consider looking into some of the third party plugin options out there (some are free, and some are not), such as TGTools Pro.

Comment actions Permalink
Avatar
0

Hi Brian,

Again, I can't thank you enough for your generosity of time and attention. All of your comments and advice are spot-on and perfectly applicable to what I'm trying to achieve. Will definitely keep you posted on my progress!


Comment actions Permalink
Avatar
0

Hello Brian,

Earlier in this post you referenced the EQ suite Reaper, which I'm currently looking into. Do you mind explaining how this plug-in gets integrated with Finale? Would I need to open the plug-in via Finale once installed? It seems like it could provide alot of value; in the past I've had to export all staves to wav files, dump them into Audacity, and then do a mix from there (the process took hours). I would love having the ability to robustly mix and control each instrument within the score. 


As always, your time, help and expertise are greatly appreciated. Thanks so much.
 

-Frank

Comment actions Permalink
Avatar
0

No problem....

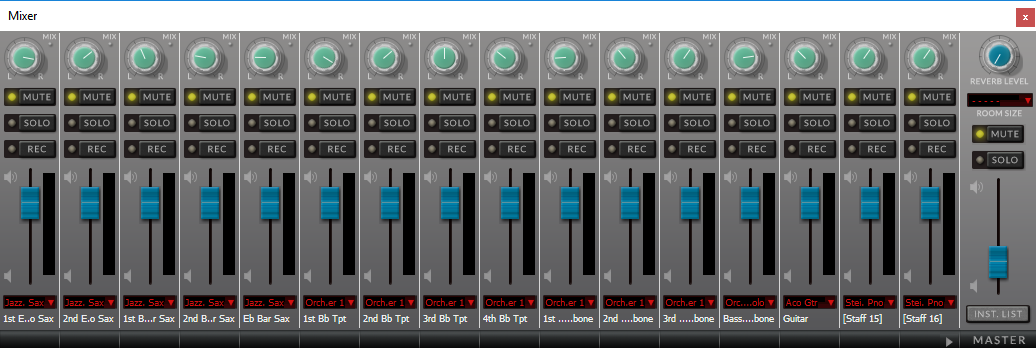
Before we get into the plugins, be aware that you can rough in the initial instrument levels and panning for the mix using Finale's Mixer.


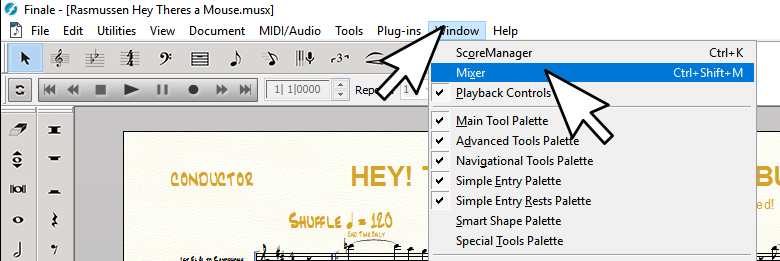
You can call up the mixer by going to "Windows/Mixer".  You can also bring that up with the key combo ctrl+shift+m


That'll bring up the Mixer:


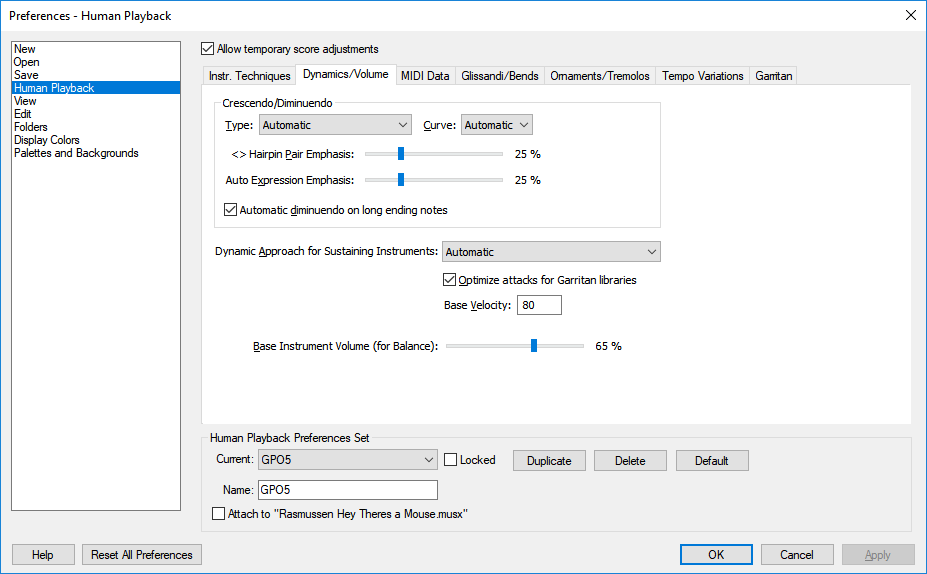
You might also want to tinker with some of the Dynamics/Volume settings under "Edit/Preferences/Human Playback/Dynamics/Volume", as these can adjust the weight of the impact for things like hair pin crecendos in an arrangement.


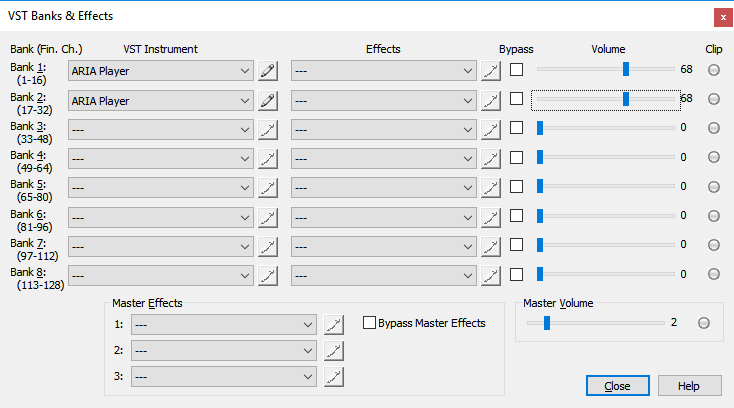
There are also settings for the general mixed output level of each VST/i bank.  How to best set these can have a lot to do with your particular audio interface.  Mine is very hot/loud, so I usually start around 70% across the board or it's way too loud/distorted on my rig, and I get clipping.  In my experience each computer can be quite different, so you'll need to experiment and try things.

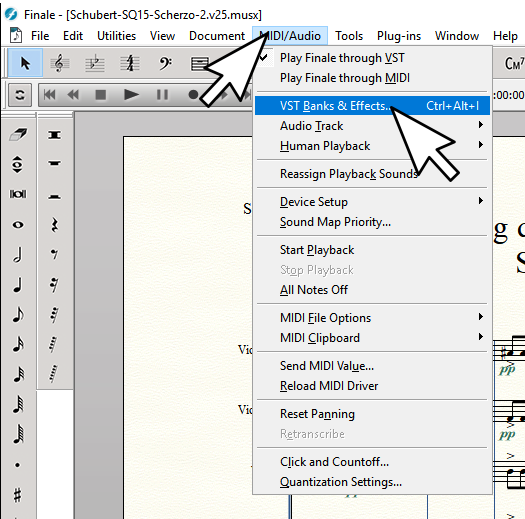
You can get to this from "MIDI/AUDIO/VST Banks & Effects..."


Do be careful, get in a habit of always starting with a lower master level before ever hitting play on a freshly loaded score and work your way up....otherwise you can damage your hearing and/or speakers!  Alternatively, if your amp/speakers have a physical volume control that's easy to reach...take advantage of that.  Lets just say I've blown one too many tweeter (and my ears rang too) in my Studio Monitors for not being more careful.....so make it a habit to turn things down when first starting up a work-session!


When sitting there composing, go easy on your ears.  Set things where it's comfortable and somewhat pleasing to work with.  Save the serious mixing till the last stages of the project.  Take lots of breaks during the mixing stage.  Don't sit there more than 10 or 20 minutes at a time working on mix.  It'll play serious tricks on your ears/brain and you might even learn to love 'bad stuff' if you do!


When it comes time to render things to a wav File,  I personally like to almost max out the Master levels without clipping, leaving approximately 10db or so headroom from the loudest point of the piece (in case I decide to do some mastering touches in something like Wavelab or AudiaCity).  In my case this requires me to physically turn down my amp/speakers while I'm rendering, otherwise I can't stay in the room with it.  That can save me the step of needing to 'normalize' the thing in a third party utility.


Now for the plugins.  ReaEQ and ReaXcomp save me so much time, and improve the quality of what I hear 110%.  It's hard to explain other than to say, play with the plugins and see what they can do.  You'll be glad for it in the long run.


First you'd just grab the free VST plugin pack from here.

https://www.reaper.fm/reaplugs/

If you are running any version of Finale AFTER 2014.5, then you'll want the 64bit versions.

If you are running 2014.5 or earlier, then you'll want the 32bit version.


Once you get everything unpacked, you'll want to make sure the plugins are in a directory that Finale scans for VST plugins.


By default I believe the the 64bit variant get unpacked into: "C:\Program Files\Vstplugins\ReaPlugs", but you can have them anywhere you like.


I think 32bit versions go here by default: "C:\Program Files (x86)\Vstplugins\ReaPlugs", but you can keep them anywhere you like.


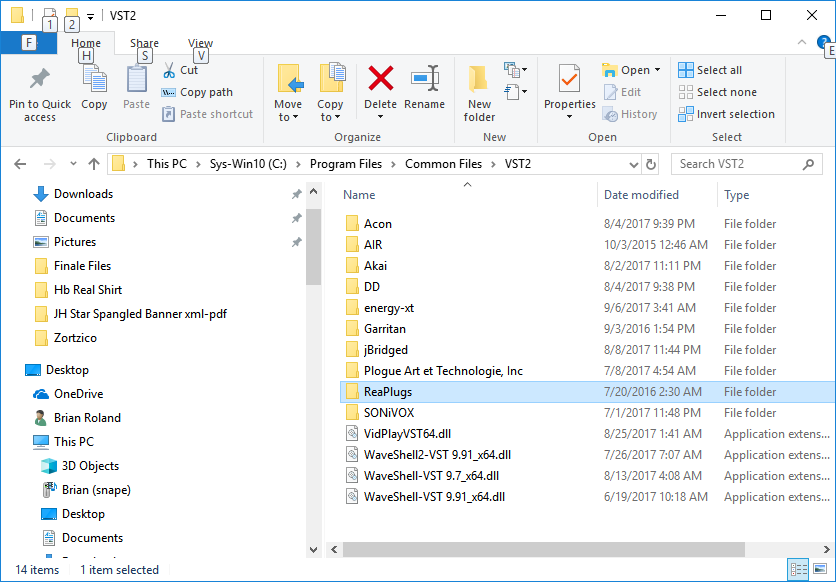
Personally I like to keep them in: "C:\Program Files\Common Files\VST2\ReaPlugs"


Where-ever you've chosen to unpack the plugins, you can direct Finale to scan that location for plugins.  This is done by going to: "MIDI/Audio/Device Setup/Manage VST Plugin Directories".


My list looks like this:


Notice that I pointed to the top level directory that holds several other folders, where I have all kinds of third party plugins I like to use in Finale. Among them is my ReaPlugs directory.  Also, for future reference, VST2 plugins always have *.dll filename extension.


The first time you add a new directory to the scan list Finale might seem to freeze up on you.  Be patient, as it's taking a moment to scan everything in that directory and create a profile for it all.


From this point forward, anytime you start Finale it's going to scan this directory to see if any valid plugins have been added.  You can also force plugin rescans from a running instance of Finale by going to: "MIDI/Audio/Device Setup/Rescan for VST Plugins".  This can come in handy if you add a plugin mid-project, or something seems to be missing that you think should be there, etc.


Note there are a couple of different types of plugins.  VST effect plugins, and VSTi instrument plugins.  Examples of VSTi plugin are things like ARIA Player, Kontakt, HALion, etc.  An example of a VST effect plugin is everything you just installed with the ReaPlugins kit.


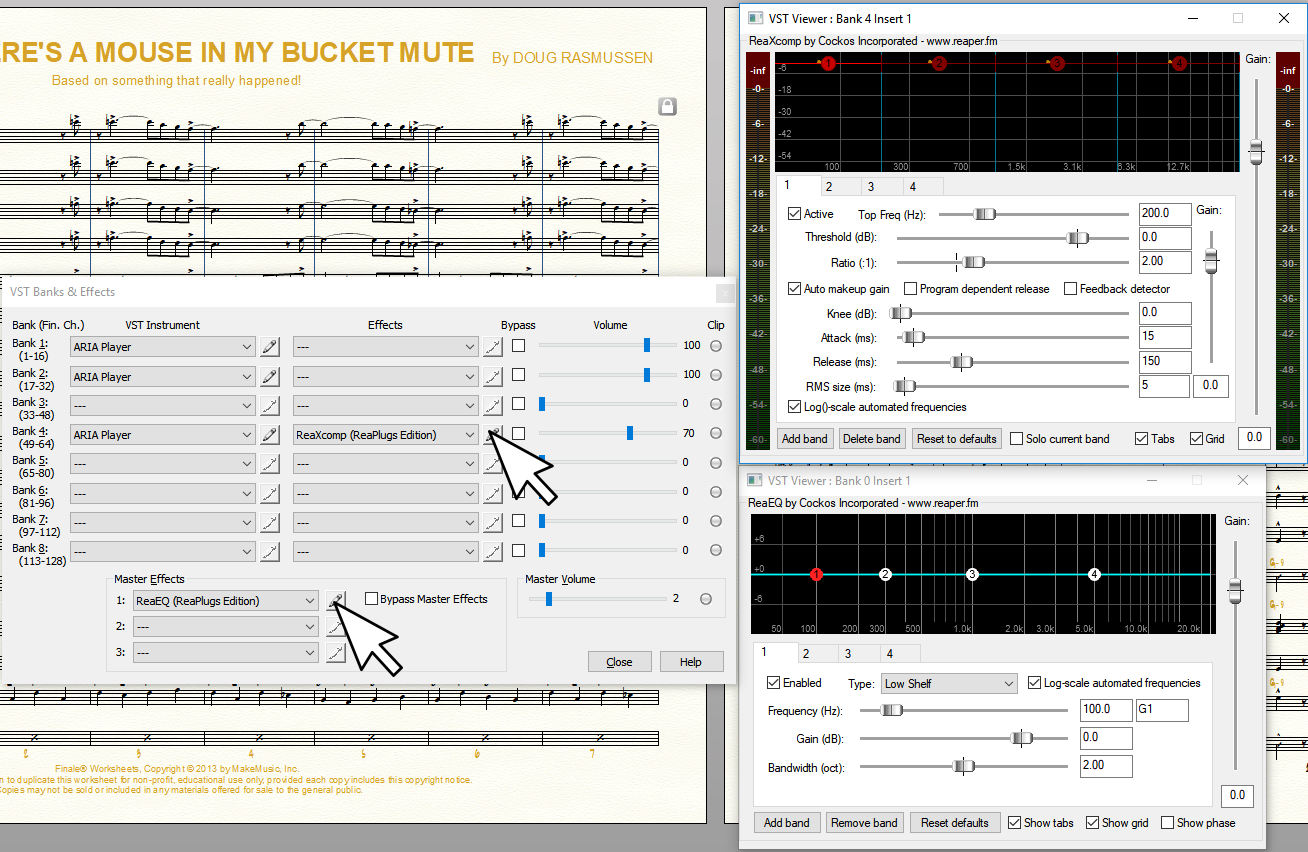
In the case of the ReaPlugs, you'll be working with VST effect slots.  In Finale these are located under "MIDIAudio/VST Banks & Effects".  Alternatively, you can bring up the dialog with the key combo ctrl+alt+l.


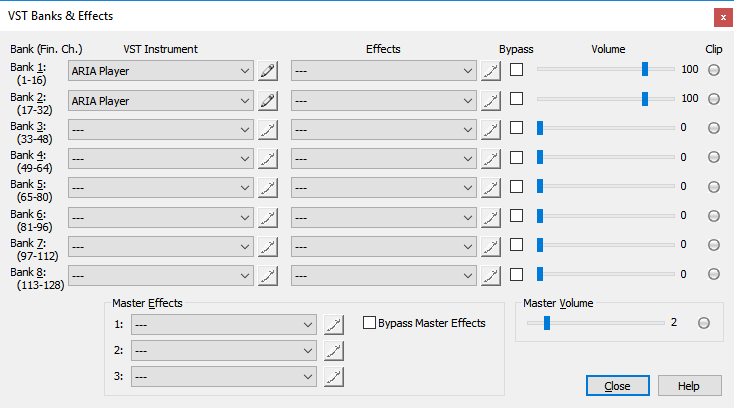
This brings up your VST Configuration which shows VSTi plugin slots on the left, and VST effect slots on the right.  You also get 3 Master Effects slots in a series, where all of your audio output gets mixed down before it finally goes through your speakers (or into a rendered audio file).


For the sake of this tutorial, lets focus on the multi-compressor and EQ plugins.

I'm going to load up the demo score that comes with Finale called:

"Hey! There's A Mouse In My Bucket Mute". 


I found that particular score located at: "C:\Program Files\Finale\Music Files\Worksheet and Repertoire\Repertoire\Large Ensembles\Rasmussen Hey Theres a Mouse.musx"


I've decided I want to add some dynamic compression to the percussion stave.  So once I've loaded the score I'm going to force the percussion stave to get a unique ARIA instance of his own so the drum kit is isolated.


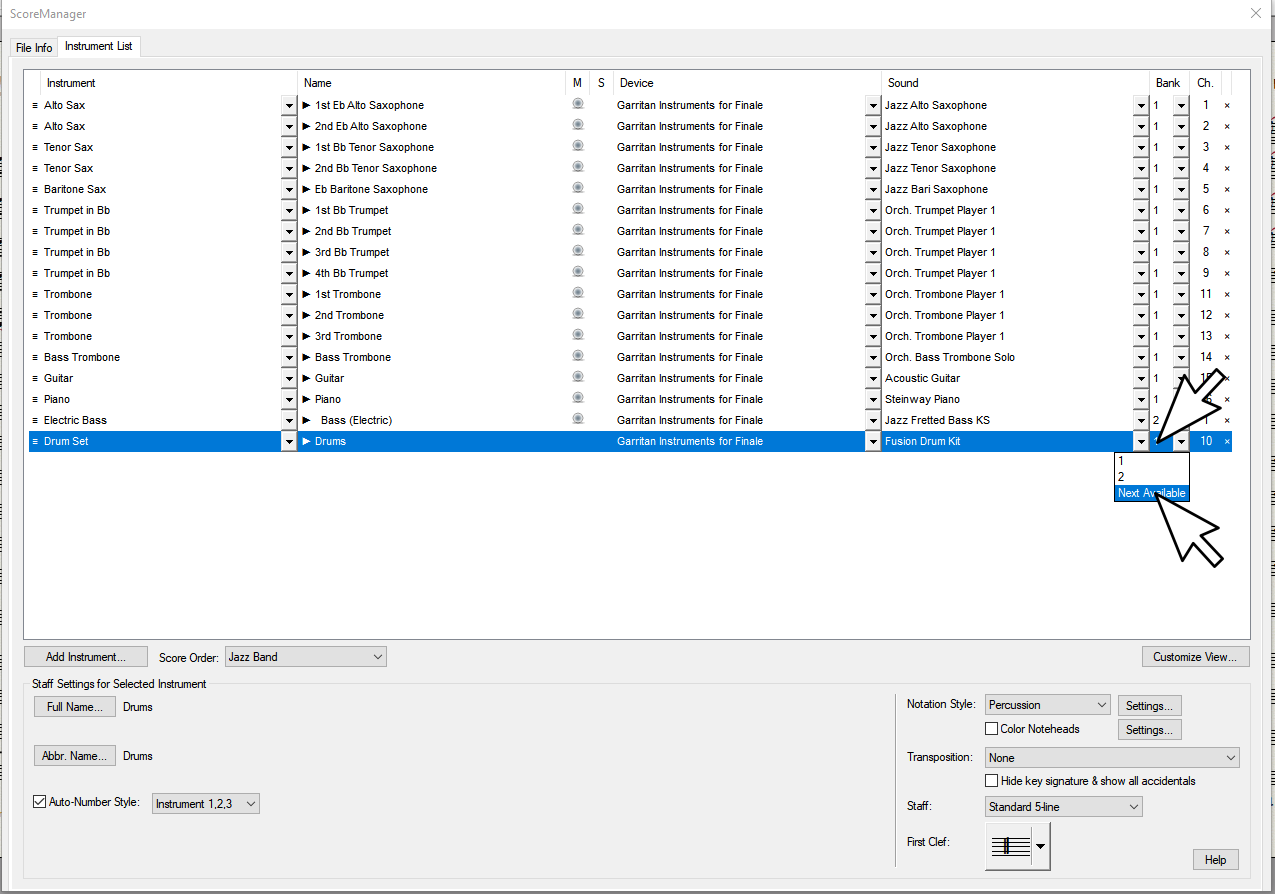
To do this I'll open the Score Manager (ctrl+k) and move the Drum Set to a new Bank.


In my case, Finale decided to make a fresh instance of ARIA in bank 4, and assign the Fusion Drum kit to channel 1.


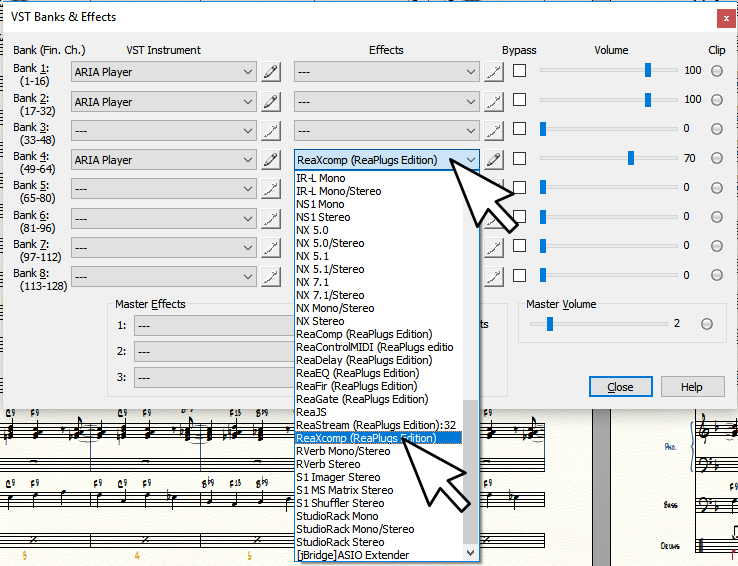
Next, I'm going to tap ctrl+alt+l to bring up my VST Banks and Effects Dialog (MIDI/Audio/VST Banks & Effects), and load the "ReaXcom" multi band compressor into the Effects slot for Bank 4. 


I've chosen this effect because I want to bring out certain frequency ranges in the trap kit so they'll cut through the mix more.  If you're not sure what a dynamic compressor does, do some searching on the internet and read up.  In short, it allows you to set a floor and ceiling for how loud and soft a signal can get.  It can bring all of the frequencies  in a signal to hover around a given relative db level and more or less stick there (and you can set roll times and such).  You can also get all sorts of interesting pumping and pulsing dynamic effects when used judiciously.  Because this is a 'multi band' compressor, we can isolate a very specific frequency ranges and compress (or not) each band independently. 


All I can say further about using a compressor/limiter at this point is read up on how dynamic compression works for pro audio applications, play around with it and let your ears teach you.


Note, I've got a lot of plugins installed, unless you do too you probably won't see but a handful listed, and they'll be named Rea-Something.


While I'm at it, I'm going to go ahead and stick ReaEQ in the first Master Effects slot.  This way I can shape the overall dynamics by frequency range for the entire master mix.  ReaEQ works pretty much like any Parametric EQ.


Now that I've loaded the plugins, I can click the little pencil icons to bring up the plugins' UIs.


Right now I'm on a workstation that has 3 screens, so I'm going to take advantage of the real estate and keep my plugins UIs open.  I can start Finale playing and tweak stuff till I like it.  I could also optionally be fiddling with the Finale mixer a bit, and making some adjustments in ARIA itself (I can get at ARIA instances by clicking those pencil icons too).  For this demonstration, though, I'm not touching anything else.  I'll do all the sound shaping to whatever this score had set up for ARIA and the mixers by default using nothing but these two plugins.


Here's a rendering of what it sounded like before I used these plugins.

https://drive.google.com/open?id=0B-9pjh4Xl8gseW9XWnpteVYwWlE


Note, there are plenty of interesting free plugins you can hunt down and try.  Chorus, reverb, etc.  If you go searching, you'll want VST2, 64bit for the latest versions of Finale.


Here's what it sounds like with a little compression on the trap set, and a bit of EQ. 

https://drive.google.com/open?id=0B-9pjh4Xl8gsLTFIQkY2anF6VUU


Note, the point of this demonstration is about using compression to bring out the trap set part.  I was not shooting for the perfect mix or anything.  As a teacher, I often want to throw something together quickly for a student.  Some of the Garritan trap sets have a nice quality to them, but just don't cut through the mix so well.  Thanks to a bit of compression, I was able to bring it out without much effort.


Comment actions Permalink
Avatar
0

P.S. On ReaPlugs:


Here's an old  thread with some posts I did (Credo) on the topic of ReaPlugs under the old forum (can no longer post there, but it's still archived):

The very last post in this link might be interesting/helpful.

https://forum.makemusic.com/default.aspx?f=5&m=481160&p=1

Comment actions Permalink
Avatar
0

HI Brian,

Unfortunately, I'm having an issue with Finale recognizing my ReaPlugs effects in the "VST Effects" banks; all drop downs appear to be grayed-out, even thought I have directed Finale to the location of the unpacked ReaPlugs (via the VST Plug-In directories dialogue box). I'm wondering if you might have some trouble-shooting tips for this issue? 


As always, thanks so much for your help!


-Frank

Comment actions Permalink
Avatar
0

Did scanning the plugins or quitting and restarting Finale help?


If not, double check that you have 64bit plugins for 64bit versions of Finale, or 32bit versions for older versions of Finale (2014.5 and earlier).  If unsure, you can put both into the same folder.  Finale will ignore the plugins it cannot use.

Comment actions Permalink
Avatar
0

While it doesn't seem like your issue, here is something that never hurts to try as a general trouble shooting practice for Finale.


If you are sure you have added the correct path to a folder holding your reaplugs as a VST Plug-In directory.


If you are sure you've got the right version of the Reaplugs pack (64bit vs 32bit).


If scanning for plugins, and restarting Finale doesn't work.


If you ever have issues with Finale not wanting to start up properly (I.E. it freezes, plugins that worked before are missing, etc.).


Here is one of the go-to trouble shooting things to try.


Hold down your windows key and press r.


Paste this in the Open dialogue:

"%APPDATA%/MakeMusic"

Click OK.


This should bring up a file explorer window showing you at least one Finale folder (One for each 'version' of Finale that might installed on your system).


Go into the Finale folder(s) and delete the "PlogueEngine" folder.


The next time you start Finale it will take it longer than normal to initialize as it rebuilds the PlogueEngine folder.  Deleting the PlogueEngine folder forces a rescan of your system and plugins.  Anything that may have somehow been blacklisted before gets a second chance to work again.


Comment actions Permalink
Avatar
0

Hello Brian,

I was wondering if you might have a moment for another question. I *love* my GPO, however I'm having difficulty uwith the KS Timpani patches; I can't hear them!! It's as if Finale is disregarding my mix and balance settings within the patch slot and adjusting the timp volume and velocity on its own. It's kind of driving me nuts. :) There are moments where I need maximum punctuation, and this timp patch is just not delivering. Any thoughts/suggestions on how I can debug? 


Thanks as always, pal. 

Comment actions Permalink
Avatar
0

I might have some ideas.


GPO5 changed up the Timpani a bit from GPO4.  I have not had a chance, nor a major reason to go into the sfz and tweak it out here, but in having a quick look here are some differences.


First, the good change, is that there seems to be more samples using different mallets.  One also gets a new tap-release roll mode, and there is a key-switching long-roll sample as well (with a bug that can be worked around in the scoring app, or fixed in the sfz, but it's there none the less).


The not so good changes (in my subjective opinion) are:  GPO5 timpani don't really respond to CC1/CC11 dynamics anymore.  In GPO4 both velocity and CC1 had an effect, and one could use CC1 to get 'dampening' effects.  In GPO5, all dynamics are done via velocity and CC7 master channel volume.


With this in mind, I'd personally try the easy/quick stuff first to see if it fits your score.  Sometimes we get lucky and find something in our library that just works better for a given score, or passage in a score.


1.  Try all the ARIA based timpani instruments available to you.  Try the ones in the Finale Default Bank (Garritan Instruments for Finale), GPO4, Instant Orchestra, etc. if you have any of those libraries installed, etc.


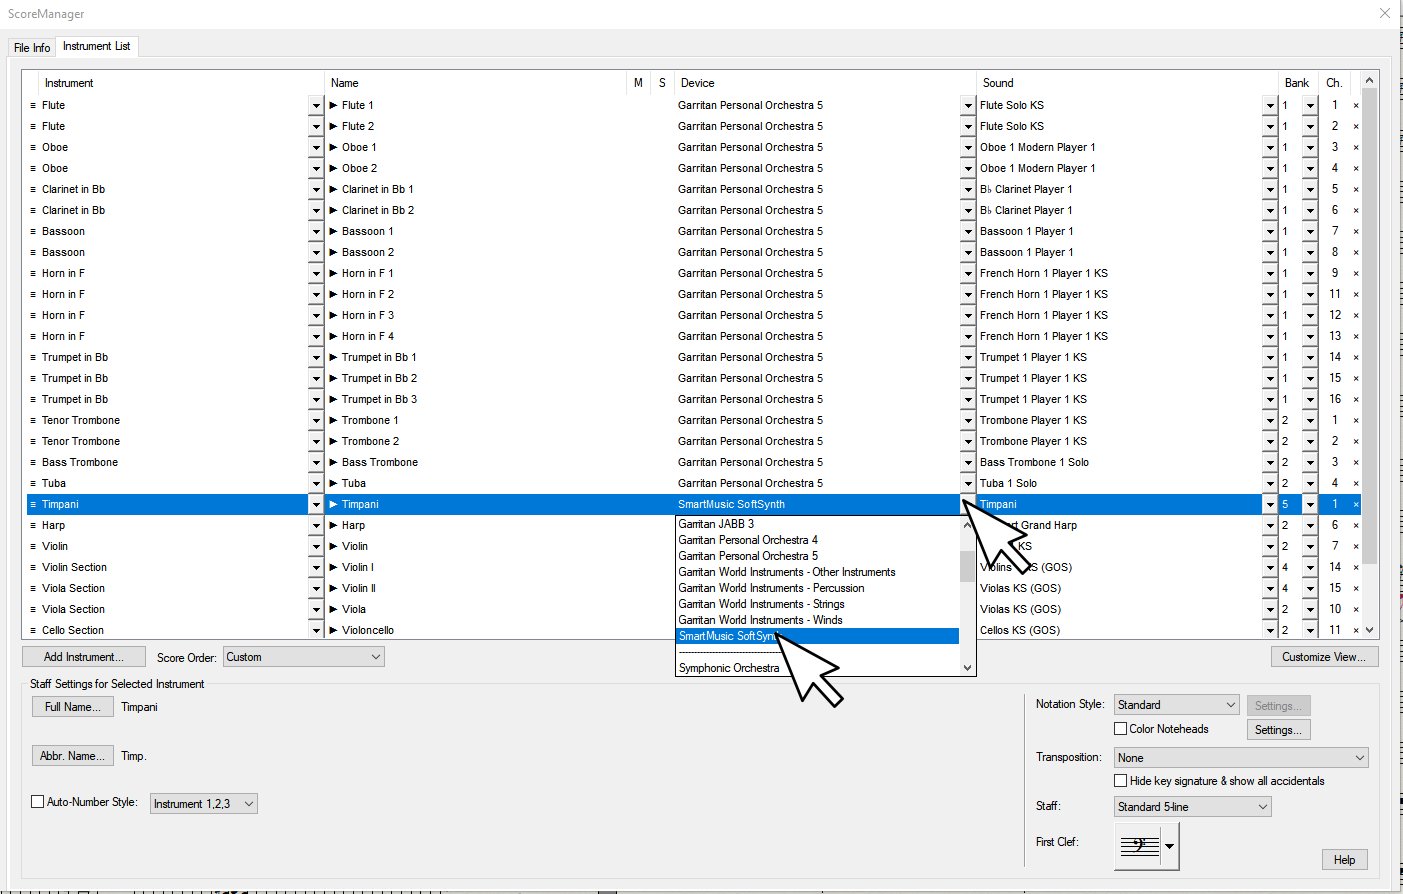
2.  Give the SmartMusic Synth GM timpani a try.


3.  Isolate the Timpani to an instance of his own, and use Compression, EQ, and other effects to put passages where you want them in the mix.  Remember you can use layers/voices to 'channel bounce' among instruments on a stave (like we did with divisi horn parts earlier in this thread).  If you need more voices than a single stave can hold, don't forget you can make a new stave and super-impose them later.


If you don't find a more suitable sound in the lot by default, go for the one(s) that have the closest overall aesthetic impact you are looking for and then sort out a strategy to get it even closer using all the bells and whistles of the instrument, such as:

1.  Changing note-on velocity.

2.  Sending CC7 or CC1 events.

3.  Sending key-switches.

4.  In some cases real time transposition may be needed...where playing different octaves 'on the keyboard' might offer different variations that actually make notes in the same 'sonic octave'.  I.E.  Playing C2 might play a single stroke, while playing C3 might play a long roll, etc.


You can manipulate these things through Finale's MIDI Tool, and/or via the Human Playback 'technique' system. 


In instruments that give variations of the same sound over different octaves on the keyboard you can force real time transpositions with HP techniques, or build percussion maps.


If that's not enough, it's possible to dig into the Garritan SFZ files themselves and tweak, or even add on to the existing Timpani setups.  You can do things like change how the dynamics are controlled, set the base db level of a sample or layer, tune, pan, and much more. 


Personally I want to someday see if I can fix the key-switch bug in the GPO5 Timpani 1 instrument where the unmetered long roll key-switch only works for the upper octave.  I'd also like to add the dampening effect back for CC1 events. 


No time to sort it these days but I'm thinking it should be possible to at least put in a "GPO4 legacy key-switch' that will toggle n-Timpani 1 KS to work and sound exactly like the old GPO4 Timpani.  Maybe someday I'll make a moment to explore this myself, but in the meanwhile, people like you could look into it.


Here's a quick primer on SFZ opcodes:

http://drealm.info/sfz/plj-sfz.xhtml

Comment actions Permalink
Avatar
0

Hello Brian,

As always, thanks for your generous reply. I've tried some other patches, and unfortunately (and predictably), they just don't "sound as good" as the GPO5 patch. That SmartSynth GM timp always sounds like a steel drum in the upper register. :)
So, I'm in the Timp SFZ file (and made a copy of the original, as per your earlier suggestion). Any ideas on which code or settings I can tweak to achieve greater presence? I'm basically looking for more velocity, a sharper attack, etc. Just more overall volume, I suppose. 

Comment actions Permalink
Avatar
0

There are quite a few ways really.


One thing that often helps is to scale all the velocity entries of the timpani stave up a bit.  There are likely several Finale tools to get this done (such as making symbols, or HP techniques)...One example I can think of is to simply use a higher terraced dynamic marking (ff instead of f, p instead of pp, etc.) for playback purposes.


For anyone who does not wish to attempt tweaking sfz opcodes, I'd also suggest simply isolating the timpani to an ARIA instance of his own, then scaling the plugin volume to be higher than that of the other plugin instances in the VST plugin control dialog.  One could also insert the free ReaPlugs Multi Compressor plugin in order to pull the timpani dynamics to where it is wanted in the mix dynamically (like I did with the drum kit in the Jazz score earlier in this thread).


As for SFZ tweaks...again there are many methods depending on the sort of instrument, and how flexible or 'real time dynamic' you wish it to be.  Sounds can get really fancy if you like, and be effected by every nuance of your key-board or wind controller....or they can be simple triggering of static samples.  The best way to learn really, is to examine existing sfz files to see how they are done, and experiment.


1.  "amplitude" opcodes for each <region> (This is an ARIA specific opcode).  These are usually used to balance out a set of samples so they have a uniform volume.  I.E.  If you had a sample that was recorded a bit too soft, it can be boosted to match others in the set.  If one is  a bit too loud, it can be lowered to match, etc.  In theory, you could boost the amplitude of all the samples in a <group> to make the overall patch a bit louder.


2.  "volume" opcodes as value in decibels from -144 to 6 (floating values supported).  I believe this opcode can be used at <group> as well as <region> levels.  When used at the <group> level, it sets a base volume for all <regions> in the group unless you over-ride it by entering some other value for volume in a <region>


ARIA supports an extended range of 'volume' opcodes such as "master_volume" as well.  You can read up on those here at the Plogue User Forum


3.  You can use the EQ opcodes to boost or cut a specific frequency range.  Essentially you'd be setting the default values for ARIA's built in EQ.  You can also change these EQ values in the ARIA control panel.  While working the controls for EQ in ARIA will over-ride any EQ settings you make in the sfz file, you can have some preset default EQ settings to shape up the sound's dynamics.


4.  Altering the ampeg envelope values for each <group>.  Each group gets a kind of dynamic envelope that can be defined in order to shape dynamics over time (ADSR, or Attack, Delay, Sustain, Release).  It's also possible to nest dynamic envelopes, so individual regions can also have them and they will be applied in a serial manner from each individual <region>, up to the master <group> envelope.  One can even build crossfade effects and so on using a series of these dynamic envelopes.


5.  If the amp_veltrack opcode exists in your instrument and it's anything less than 100, try increasing it if you want a one to one velocity to volume ratio.  Lower veltrack if you'd rather key velocity not have as much of an impact.  If the instrument uses a velocity curve map, you might try tweaking values in the curve definition.  All this velocity tracking stuff has to do with how hard/fast a key is played.  Velocity can effect your dynamic, pitch, and lfo envelopes.


6.  It's possible to assign some MIDI CC value to alter gain in real time.

gain_oncc# with a floating value from -14 to 48db.  My understanding is the value entered here sets a scale as to how much the incoming CCs from 0 to 127 will effect the gain of the <group> or <region> with a gain_oncc opcode.  When using this method don't forget to set a default setting for the CC in the sfz header using the set_cc#=[integer value from 0 to 127] opcode.


Be careful not to assign some CC that is already used.  Avoid all CCs less than 12 for sure, from there, browse the sfz to make sure you don't pick a CC that's already being used for real time automation of some other instrument parameter.


Take a look at all the drum kit sfz files you can find.  I seem to recall that some of them have a kind of mixer built in where one can change the volume of individual kit pieces via MIDI CC events.  I.E. Bass drum, snare, overheads, etc...each have a CC so one can change volume of each kit piece independently.  I can't remember off the top of my head if GPO5 comes with such a kit, but I'm pretty sure JABB has at least one, and maybe a kit that come with Finale has it as well.

The reason I suggest examining such a drum kit, is you could then see how they set up Controllers to change dynamics via MIDI remote.


You might also find the newer Pipe Organ consoles that come with GPO5 interesting, as these demonstrate methods to have several ranks of samples with independent volume control over each rank using a CC event.


The pedaled harps can also be be great to examine for some more complex/advanced SFZ stuff.


If you can't find such a kit to study...and can't figure out how to set up a working gain control via remote, let me know.  I'm not sure when, but I'll try to work up an example sfz to demonstrate.


7.  There are probably more...I just can't think of anymore off the top of my head right now.

Comment actions Permalink

Please sign in to leave a comment.